 In our last post, we calculated Pearson and Spearman correlation coefficients in R and got a surprising result.
So let’s investigate the data a little more with a scatter plot.
We use the same version of the data set of tourists. We have data on tourists from different nations, their gender, number of children, and how much they spent on their trip.
Again we copy and paste the following array into R.
M <- structure(list(COUNTRY = structure(c(3L, 3L, 3L, 3L, 1L, 3L, 2L, 3L, 1L, 3L, 3L, 1L, 2L, 2L, 3L, 3L, 3L, 2L, 3L, 1L, 1L, 3L,

1L, 2L), .Label = c("AUS", "JAPAN", "USA"), class = "factor"),GENDER = structure(c(2L, 1L, 2L, 2L, 1L, 2L, 1L, 2L, 1L, 2L, 2L, 1L, 1L, 1L, 1L, 2L, 1L, 1L, 2L, 2L, 1L, 1L, 1L, 2L), .Label = c("F", "M"), class = "factor"), CHILDREN = c(2L, 1L, 3L, 2L, 2L, 3L, 1L, 0L, 1L, 0L, 1L, 2L, 2L, 1L, 1L, 1L, 0L, 2L, 1L, 2L, 4L, 2L, 5L, 1L), SPEND = c(8500L, 23000L, 4000L, 9800L, 2200L, 4800L, 12300L, 8000L, 7100L, 10000L, 7800L, 7100L, 7900L, 7000L, 14200L, 11000L, 7900L, 2300L, 7000L, 8800L, 7500L, 15300L, 8000L, 7900L)), .Names = c("COUNTRY", "GENDER", "CHILDREN", "SPEND"), class = "data.frame", row.names = c(NA, -24L))
 M

attach(M)
plot(CHILDREN, SPEND)
(more…)
 Let’s use R to explore bivariate relationships among variables.
Part 7 of this series showed how to do a nice bivariate plot, but it’s also useful to have a correlation statistic.
We use a new version of the data set we used in Part 20 of tourists from different nations, their gender, and number of children. Here, we have a new variable – the amount of money they spend while on vacation.
First, if the data object (A) for the previous version of the tourists data set is present in your R workspace, it is a good idea to remove it because it has some of the same variable names as the data set that you are about to read in. We remove A as follows:
rm(A)
Removing the object A ensures no confusion between different data objects that contain variables with similar names.
Now copy and paste the following array into R.
M <- structure(list(COUNTRY = structure(c(3L, 3L, 3L, 3L, 1L, 3L, 2L, 3L, 1L, 3L, 3L, 1L, 2L, 2L, 3L, 3L, 3L, 2L, 3L, 1L, 1L, 3L,

1L, 2L), .Label = c("AUS", "JAPAN", "USA"), class = "factor"),GENDER = structure(c(2L, 1L, 2L, 2L, 1L, 2L, 1L, 2L, 1L, 2L, 2L, 1L, 1L, 1L, 1L, 2L, 1L, 1L, 2L, 2L, 1L, 1L, 1L, 2L), .Label = c("F", "M"), class = "factor"), CHILDREN = c(2L, 1L, 3L, 2L, 2L, 3L, 1L, 0L, 1L, 0L, 1L, 2L, 2L, 1L, 1L, 1L, 0L, 2L, 1L, 2L, 4L, 2L, 5L, 1L), SPEND = c(8500L, 23000L, 4000L, 9800L, 2200L, 4800L, 12300L, 8000L, 7100L, 10000L, 7800L, 7100L, 7900L, 7000L, 14200L, 11000L, 7900L, 2300L, 7000L, 8800L, 7500L, 15300L, 8000L, 7900L)), .Names = c("COUNTRY", "GENDER", "CHILDREN", "SPEND"), class = "data.frame", row.names = c(NA, -24L))
 M

attach(M)
Do tourists with greater numbers of children spend more? Let’s calculate the correlation between CHILDREN and SPEND, using the cor() function.
R <- cor(CHILDREN, SPEND)

[1] -0.2612796
We have a weak correlation, but it’s negative! Tourists with a greater number of children tend to spend less rather than more!
(Even so, we’ll plot this in our next post to explore this unexpected finding).
We can round to any number of decimal places using the round() command.
round(R, 2)

[1] -0.26
The percentage of shared variance (100*r2) is:
100 * (R**2)

[1] 6.826704
To test whether your correlation coefficient differs from 0, use the cor.test() command.
cor.test(CHILDREN, SPEND)

 Pearson's product-moment correlation

data: CHILDREN and SPEND

t = -1.2696, df = 22, p-value = 0.2175

alternative hypothesis: true correlation is not equal to 0

95 percent confidence interval:

-0.6012997 0.1588609

sample estimates:

cor

-0.2612796
The cor.test() command returns the correlation coefficient, but also gives the p-value for the correlation. In this case, we see that the correlation is not significantly different from 0 (p is approximately 0.22).
Of course we have only a few values of the variable CHILDREN, and this fact will influence the correlation. Just how many values of CHILDREN do we have? Can we use the levels() command directly? (Recall that the term “level” has a few meanings in statistics, once of which is the values of a categorical variable, aka “factor“).
levels(CHILDREN)

NULL
R does not recognize CHILDREN as a factor. In order to use the levels() command, we must turn CHILDREN into a factor temporarily, using as.factor().
levels(as.factor(CHILDREN))

[1] "0" "1" "2" "3" "4" "5"
So we have six levels of CHILDREN. CHILDREN is a discrete variable without many values, so a Spearman correlation can be a better option. Let’s see how to implement a Spearman correlation:
cor(CHILDREN, SPEND, method ="spearman")

[1] -0.3116905
We have obtained a similar but slightly different correlation coefficient estimate because the Spearman correlation is indeed calculated differently than the Pearson.
Why not plot the data? We will do so in our next post.
About the Author: David Lillis has taught R to many researchers and statisticians. His company, Sigma Statistics and Research Limited, provides both on-line instruction and face-to-face workshops on R, and coding services in R. David holds a doctorate in applied statistics.
See our full R Tutorial Series and other blog posts regarding R programming.
 Sometimes when you’re learning a new stat software package, the most frustrating part is not knowing how to do very basic things. This is especially frustrating if you already know how to do them in some other software.
Let’s look at some basic but very useful commands that are available in R.
We will use the following data set of tourists from different nations, their gender and numbers of children. Copy and paste the following array into R.
A <- structure(list(NATION = structure(c(3L, 3L, 3L, 1L, 3L, 2L, 3L,
1L, 3L, 3L, 1L, 2L, 2L, 3L, 3L, 3L, 2L), .Label = c("CHINA",
"GERMANY", "FRANCE"), class = "factor"), GENDER = structure(c(1L,
2L, 2L, 1L, 2L, 1L, 2L, 1L, 2L, 2L, 1L, 1L, 1L, 1L, 2L, 1L, 1L
), .Label = c("F", "M"), class = "factor"), CHILDREN = c(1L,
3L, 2L, 2L, 3L, 1L, 0L, 1L, 0L, 1L, 2L, 2L, 1L, 1L, 1L, 0L, 2L
)), .Names = c("NATION", "GENDER", "CHILDREN"), row.names = 2:18, class = "data.frame")
Want to check that R read the variables correctly? We can look at the first 3 rows using the head() command, as follows:
head(A, 3)
  NATION   GENDER   CHILDREN
2 FRANCE      F        1
3 FRANCE      M        3
4 FRANCE      M        2
Now we look at the last 4 rows using the tail() command:
tail(A, 4)
    NATION   GENDER  CHILDREN
15  FRANCE      F        1
16  FRANCE      M        1
17  FRANCE      F        0
18 GERMANY      F        2
Now we find the number of rows and number of columns using nrow() and ncol().
nrow(A)
[1] 17

ncol(A)
[1] 3
So we have 17 rows (cases) and three columns (variables). These functions look very basic, but they turn out to be very useful if you want to write R-based software to analyse data sets of different dimensions.
Now let’s attach A and check for the existence of particular data.
attach(A)
As you may know, attaching a data object makes it possible to refer to any variable by name, without having to specify the data object which contains that variable.
Does the USA appear in the NATION variable? We use the any() command and put USA inside quotation marks.
any(NATION == "USA")
[1] FALSE
Clearly, we do not have any data pertaining to the USA.
What are the values of the variable NATION?
levels(NATION)
[1] "CHINA"   "GERMANY" "FRANCE"
How many non-missing observations do we have in the variable NATION?
length(NATION)
[1] 17
OK, but how many different values of NATION do we have?
length(levels(NATION))
[1] 3
We have three different values.
Do we have tourists with more than three children? We use the any() command to find out.
any(CHILDREN > 3)
[1] FALSE
None of the tourists in this data set have more than three children.
Do we have any missing data in this data set?
In R, missing data is indicated in the data set with NA.
any(is.na(A))
[1] FALSE
We have no missing data here.
Which observations involve FRANCE? We use the which() command to identify the relevant indices, counting column-wise.
which(A == "FRANCE")
[1]  1  2  3  5  7  9 10 14 15 16
How many observations involve FRANCE? We wrap the above syntax inside the length() command to perform this calculation.
length(which(A == "FRANCE"))
[1] 10
We have a total of ten such observations.
That wasn’t so hard! In our next post we will look at further analytic techniques in R.
About the Author: David Lillis has taught R to many researchers and statisticians. His company, Sigma Statistics and Research Limited, provides both on-line instruction and face-to-face workshops on R, and coding services in R. David holds a doctorate in applied statistics.
See our full R Tutorial Series and other blog posts regarding R programming.

In my last article, Hierarchical Regression in Stata: An Easy Method to Compare Model Results, I presented the following table which examined the impact several predictors have on one’ mental health.

At the bottom of the table is the number of observations (N) contained within each sample.
The sample sizes are quite large. Does it really matter that they are different? The answer is absolutely yes.
Fortunately in Stata it is not a difficult process to use the same sample for all four models shown above.
Some background info:
As I have mentioned previously, Stata stores results in temp files. You don’t have to do anything to cause Stata to store these results, but if you’d like to use them, you need to know what they’re called.
To see what is stored after an estimation command, use the following code:
ereturn list
After a summary command:
return list
One of the stored results after an estimation command is the function e(sample). e(sample) returns a one column matrix. If an observation is used in the estimation command it will have a value of 1 in this matrix. If it is not used it will have a value of 0.
Remember that the “stored” results are in temp files. They will disappear the next time you run another estimation command.
The Steps
So how do I use the same sample for all my models? Follow these steps.
Using the regression example on mental health I determine which model has the fewest observations. In this case it was model four.
I rerun the model:
regress MCS weeks_unemployed i.marital_status kids_in_house religious_attend income
Next I use the generate command to create a new variable whose value is 1 if the observation was in the model and 0 if the observation was not. I will name the new variable “in_model_4”.
gen in_model_4 = e(sample)
Now I will re-run my four regressions and include only the observations that were used in model 4. I will store the models using different names so that I can compare them to the original models.
My commands to run the models are:
regress MCS weeks_unemployed i.marital_status if in_model_4==1
estimates store model_1a
regress MCS weeks_unemployed i.marital_status kids_in_house if in_model_4==1
estimates store model_2a
regress MCS weeks_unemployed i.marital_status kids_in_house religious_attend if in_model_4==1
estimates store model_3a
regress MCS weeks_unemployed i.marital_status kids_in_house religious_attend income if in_model_4==1
estimates store model_4a
Note: I could use the code if in_model_4 instead of if in_model_4==1. Stata interprets dummy variables as 0 = false, 1 = true.
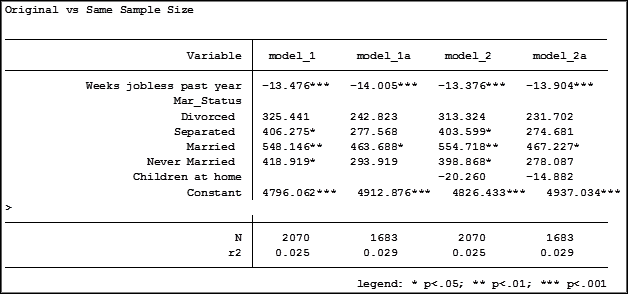
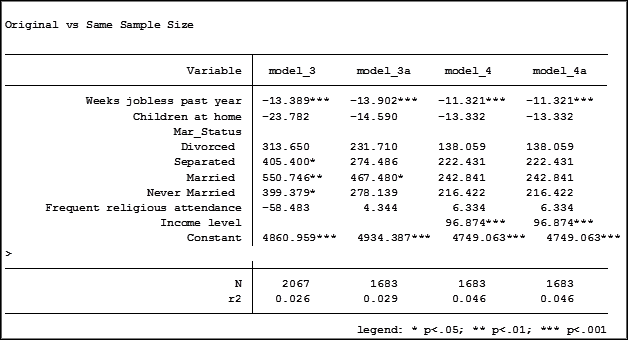
Here are the results comparing the original models (eg. Model_1) versus the models using the same sample (eg. Model_1a):


Comparing the original models 3 and 4 one would have assumed that the predictor variable “Income level” significantly impacted the coefficient of “Frequent religious attendance”. Its coefficient changed from -58.48 in model 3 to 6.33 in model 4.
That would have been the wrong assumption. That change is coefficient was not so much about any effect of the variable itself, but about the way it causes the sample to change via listwise deletion. Using the same sample, the change in the coefficient between the two models is very small, moving from 4 to 6.
Jeff Meyer is a statistical consultant with The Analysis Factor, a stats mentor for Statistically Speaking membership, and a workshop instructor. Read more about Jeff here.

An “estimation command” in Stata is a generic term used for a command that runs a statistical model. Examples are regress, ANOVA, Poisson, logit, and mixed.
Stata has more than 100 estimation commands.
Creating the “best” model requires trying alternative models. There are a number of different model building approaches, but regardless of the strategy you take, you’re going to need to compare them.
Running all these models can generate a fair amount of output to compare and contrast. How can you view and keep track of all of the results?
You could scroll through the results window on your screen. But this method makes it difficult to compare differences.
You could copy and paste the results into a Word document or spreadsheet. Or better yet use the “esttab” command to output your results. But both of these require a number of time consuming steps.
But Stata makes it easy: my suggestion is to use the post-estimation command “estimates”.
What is a post-estimation command? A post-estimation command analyzes the stored results of an estimation command (regress, ANOVA, etc).
As long as you give each model a different name you can store countless results (Stata stores the results as temp files). You can then use post-estimation commands to dig deeper into the results of that specific estimation.
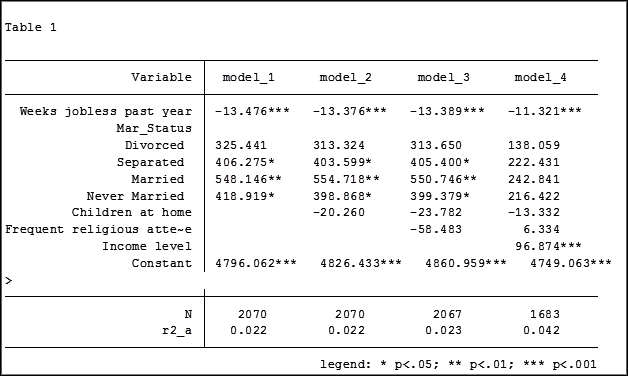
Here is an example. I will run four regression models to examine the impact several factors have on one’s mental health (Mental Composite Score). I will then store the results of each one.
regress MCS weeks_unemployed i.marital_status
estimates store model_1
regress MCS weeks_unemployed i.marital_status kids_in_house
estimates store model_2
regress MCS weeks_unemployed i.marital_status kids_in_house religious_attend
estimates store model_3
regress MCS weeks_unemployed i.marital_status kids_in_house religious_attend income
estimates store model_4
To view the results of the four models in one table my code can be as simple as:
estimates table model_1 model_2 model_3 model_4
But I want to format it so I use the following:
estimates table model_1 model_2 model_3 model_4, varlabel varwidth(25) b(%6.3f) /// star(0.05 0.01 0.001) stats(N r2_a)
Here are my results:

My base category for marital status was “widowed”. Is “widowed” the base category I want to use in my final analysis? I can easily re-run model 4, using a different reference group base category each time.
Putting the results into one table will make it easier for me to determine which category to use as the base.

Note in table 1 the size of the samples have changed from model 2 (2,070) to model 3 (2,067) to model 4 (1,682). In the next article we will explore how to use post-estimation data to use the same sample for each model.
Jeff Meyer is a statistical consultant with The Analysis Factor, a stats mentor for Statistically Speaking membership, and a workshop instructor. Read more about Jeff here.
Stata has perhaps the best support resources of any statistical software
to help you prepare and analyze your data. These resources are helpful
for all skill levels, from beginners to advanced users.
For just about any Stata command, there are FAQs, text books, Stata
Journal articles, and third party add-ons, not to mention the built in
help page.
Even these help pages are detailed — broken into subsections;
description, syntax, menu, and examples.
Learning the nuances of the resources and how to quickly find the one
you need will help you create accurate analysis in significantly less time.
We will start by exploring commands with few options such as *generate*
and *navigate* to commands with many options such as *egen.*
**
This free one hour webinar will be packed full of information that will
help reduce those frustrating moments that we all experience when using
software.
Title: How to Benefit from Stata’s Bountiful Help Resources
Date: Thurs Dec 17, 2015
Time: 2:00pm EST
Presenter: Jeff Meyer
This webinar has already taken place. Please sign up below to get access to the video recording.
Share the free December 2015 webinar with others!


Jeff Meyer is a statistical consultant with The Analysis Factor, a stats mentor for Statistically Speaking membership, and a workshop instructor. Read more about Jeff here.
 In our last post, we calculated Pearson and Spearman correlation coefficients in R and got a surprising result.


